When it comes to burgers, it’s safe to say: the juicier the better! The very best burgers achieve maximum levels of bliss by strategically layering different delicious, albeit sloppy, components.
First, the burger itself should be full of flavorful juice (bonus points if that flavorful bounty runs down your hands and chin with every bite) — that’s why marbling and a generous lean-to-fat ratio are so prized. Many experts recommend 80/20 ground chuck as the gold standard … though there’s nothing wrong at all with experimenting with different flavor profiles and custom blends of cuts, as long as the potential for plenty of juice stays high.
Then, of course, is the cheese. No matter what kind you like, the goal is ooey-gooey goodness. Sure, there’s plenty to be said for flavorful blue or cheddar, but let’s face it … they just don’t melt as satisfyingly as fresh mozzarella, Monterey jack or … gasp … good ol’ American cheese. (It didn’t get to be the quintessential cheeseburger cheese for no reason, you know.)
Finally, the toppings you choose can further enhance what is essentially already the complete package. Whether you go the traditional route with satisfyingly saucy condiments like ketchup or yellow mustard, or amp up the impact with a flavorful aioli or mayonnaise, your toppers are the final stage of the juicy trifecta.
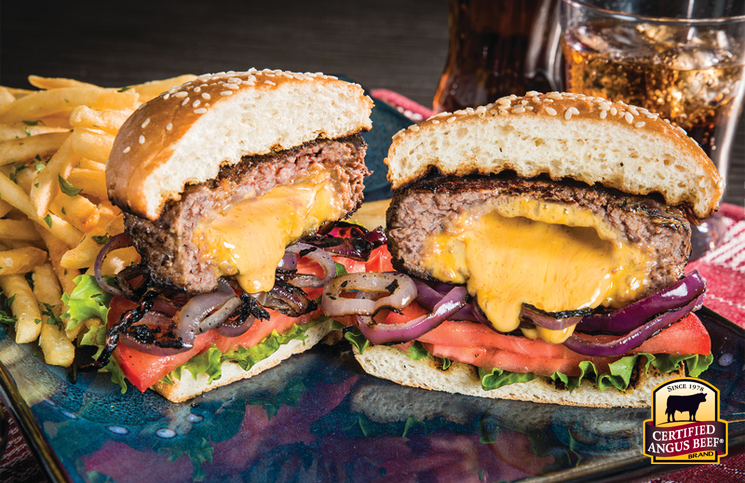
Now, chances are, you’ve been putting your burgers together in exactly that way: meat, cheese, toppings. And that totally works. But what if you stuffed your burgers with that ooey-gooey, melty cheese before cooking? As the burger cooks, the cheese melts on the inside, becoming a flavorful, juicy surprise awaiting its chance to dance on your taste buds … and cause you to reach for an additional napkin or two. (I’ll go ahead and say it … if your shirt’s clean when you’re done eating, you didn’t do it right!)
This delicious twist is one that’s been enjoyed by the good folks of Minneapolis for years. Called the “Juicy Lucy” (or “Jucy Lucy,” depending on where you go), newbies are usually advised to let the burger cool a minute or two before diving in, so that the cheese isn’t too molten on the tongue.
By all means, if you have a chance to try one in the Twin Cities, do not hesitate! But if you can’t get there anytime soon, here’s a delicious version that’s surprisingly simple to make at home. Our advice: form the stuffed patties in advance, and return to the refrigerator before cooking. Before you know it, you’ll be enjoying juicy perfection. Want to change your cheese? No problem, as long as it’s one that melts well. As far as toppings, let your imagination be your guide.
When it’s all said and done, just two questions remain: Who is Lucy? And, how can I get a burger this delicious named after me?
Juicy Lucy Burger
A burger with a warm cheesy center is a present begging to be bitten. Dive in with napkins handy! Tip: when taking the temperature of burgers we usually recommend inserting thermometer horizontally into the center. To insure you are taking temperature of the meat and not the cheese, carefully insert horizontally keeping near the edge. Monterey Jack cheese would also be a great choice of cheese.
- 1 1/2 pounds Certified Angus Beef ® ground beef (80/20 blend ideal)
- 6 slices American cheese
- 3 cloves fresh garlic, finely chopped (or substitute 1 teaspoon garlic powder)
- 1 teaspoon Worcestershire sauce
- 1/2 teaspoon coarse kosher salt
- 1/2 teaspoon freshly ground black pepper
- Canola cooking spray
- 4 buns
- Grill pan or cast iron pan (optional)
- Cut each cheese slice evenly into 4 squares; arrange in 4 stacks with 6 slices each.
- In a large mixing bowl combine ground beef, garlic, Worcestershire, salt and pepper; mix by hand.
- Form beef mixture into 8 thin patties on a large sheet pan. With your thumb, press an indented well in the center of 4 patties and put the portioned cheese in the wells. Encase the cheese with the remaining 4 patties, hand forming your burger to a uniform shape with sealed edges. Refrigerate at least 30 minutes before grilling.
- Spray burgers with a light coat of cooking spray. Grill or pan sear over high heat 3 minutes per side. Transfer to cool side of grill or 375°F oven to finish cooking to an internal doneness of 160°F (5 to 8 minutes).
- Remove from grill and rest at least 3 minutes for cheese to set.